How to Make a Grazing Table in 5 Easy Steps
Last Updated on May 4, 2023 by Project Party
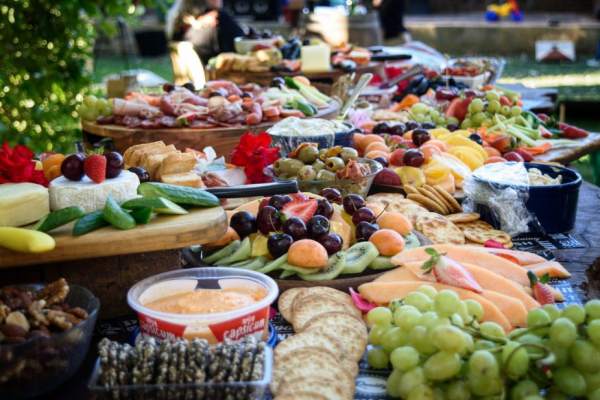
There is nothing quite like a grazing table. A beautiful array of cheese, meats, fruits, vegetables, crackers and dips are all artfully arranged on one big table. It is the perfect appetizer for any party or gathering. The best part about grazing tables is that they can be easily customized to suit any taste or occasion. In this blog post, I will share with you my tips and tricks for making a grazing table that will knock your socks off. So grab your apron and let’s get started!
How to Make a Grazing Table: Tips and Tricks from the Land Down Under
Did you know that grazing tables:
- originated in Australia! Aussies are known for their delicious food
- presentation is key for any grazing table and it’s all about the layering
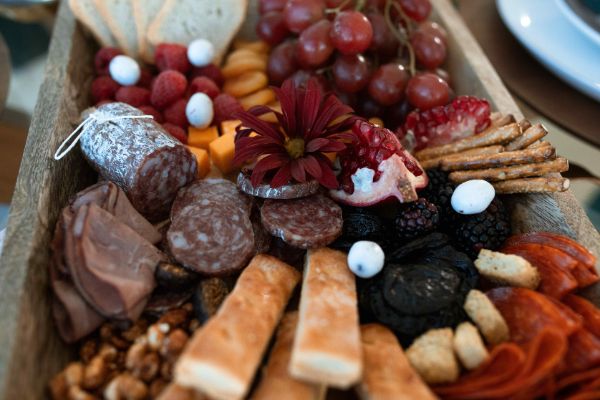
- should include a variety of cheese, meats, fruits, vegetables, crackers and dips, and
- have become one of the most popular dishes for entertaining.

To make your grazing table, you’ll need the following supplies:
- 1 large cutting board or platter
- 1 sharp knife
- 2-3 different kinds of cheese (I like to use a variety of textures and flavours)
- 2-3 different kinds of meat (I like to use a mix of cured and fresh meats)
- 1-2 kinds of fruit (grapes, strawberries, etc.)
- 1-2 kinds of vegetables (carrots, celery, cucumber, etc.)
- a variety of crackers
- 1-2 dips or spreads (hummus, mustard, etc.), and
- nuts and dried fruit (optional).
Step 1: Choose Your Board
Choosing the right board for your grazing table is essential. I prefer to use a large cutting board or wooden plank because it gives me plenty of space to work with. If you are short on space, you can also use a large plate or even a tray. Just make sure that whatever you use is big enough to fit all of the food you plan on putting on it.
Two things to consider:
- Amount of guests – if you are feeding a lot of people it is best to get a larger board or platter but as a basic rule of thumb for 5-10 people you’ll need a board at least 1m x 40cm.
- Style and presentation – you can choose a board to match the decor of your event, opt for a sleek blackboard for an elegant affair or a natural timber board for a rustic gathering.
- Shape – round or rectangular, it all depends on the look you but benefits for each include being able to see all the food easily and having a larger surface area for more grazing options.

Step 2: Plan Out Your Grazing Table
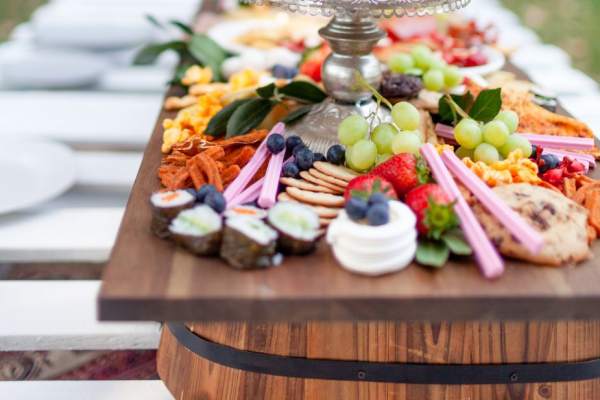
Once you have your board ready, it’s time to start planning out how you want your grazing table to look. Start by deciding what type of food you want to include. I like to use a mix of cheese, meats, fruits, vegetables, crackers and dips.
I’d recommend sticking to 3-5 items max per category, otherwise, you don’t have enough room for everything. For example, if you want to include cheese, use a mix of hard and soft cheeses such as cheddar, brie and gouda. If you want to include meats, choose a few cured types of meat and some fresh options like salami and prosciutto or smoked salmon.
You’ll likely want to have backups of crackers and dips as these tend to get eaten quickly.
Step 3: Prep the Ingredients
This will just include gathering your supplies and:
- Prep your cheese – slice or cube the cheese into bite-size pieces if you’d prefer not to include a knife and I typically use a mix of hard, semi-soft and soft cheeses.
- Slice your meats – slice meats into thin pieces and prep other meats so they are easy to pick up I typically use a mix of cured and fresh meats.
- Cut the fruits and vegetables – cut them into bite-size pieces I like to use a variety of shapes and colours and I typically use 2-3 different fruits and vegetables such as grapes, strawberries, carrots, celery, and cucumber.
- Prep your crackers – not a lot to do there but I like to place a few different types of crackers around the board.
- Prep your dips – warm up any store-bought dips or make your own if you have time such as hummus, pesto or tzatziki.
Step 4: Assemble Your Grazing Table
Now comes the fun part – assembling your grazing table! Start by adding all of the cheeses to one side of the board/plate/tray. Then add the meats on top of or next to the cheeses. Add the fruits and vegetables next, followed by the crackers last. If you are using nuts and dried fruit, sprinkle them over top of the other foods now. Lastly, add dips or spreads in small bowls along with any utensils you might need (for example chopsticks if you are including sushi).
Step 5: Styling and Decorating
Once all of your food is assembled on the board/plate/tray, it’s time to style it! This part is totally up to you – have fun with it!
Some ideas include:
- adding sprigs of herbs (like rosemary or thyme)
- placing edible flowers around the perimeter
- drizzling honey over the top of the cheese
- sprinkling seeds or nuts, or
- even adding small flags to label the items on the table.
Get creative – there are no wrong answers here but some general tips for styling food from the experts include:
- Keeping colours balanced and vibrant – this could mean using a variety of colourful fruits and vegetables or adding edible flowers.
- Creating layers of food – this could mean having different heights of food or using a mix of small and large items.
- Adding texture to the table – this could mean adding nuts, seeds or herbs in sections or placed randomly around the food.
- Adding height with small bowls – this could mean adding dips, small items like olives or even honeycomb.
- Placing items in sections – this could mean separating the meats from the cheese or creating a dip-centric corner.
- Make sure to leave some blank space for the eye – this could mean leaving some empty space or making sure that all of the ingredients aren’t touching one another.
- Adding a backdrop – this could mean adding a tablecloth, serviettes or even greenery as structural pieces.
And there you have it – your very own homemade grazing table! This grazing table is perfect for any party or gathering. It is sure to impress your guests with its beautiful presentation and delicious array of flavours.
Grazing tables are a popular food item at parties and events because they offer a variety of flavours and textures that can please any crowd. While some guests may be looking for something savoury, others might prefer something sweet. For those who like to mix their flavours, grazing tables provide the perfect opportunity to create their own flavour combinations. In fact, grazing tables are so versatile that they can even be tailored to match the theme of the event. Whether it’s a rustic country affair or a formal black-tie affair, grazing tables are sure to add a touch of class to any gathering.
So what are you waiting for? Gather your supplies, follow these simple steps and get ready to graze!
Need Grazing Table Ideas for Your Event, Wedding or Party Catering?
Thinking of organising a grazing table for your event? Check out our expert grazing table ideas and resources to make an informed decision. From tips to advice, we’ve got you covered!
Related Posts

8 Best Grazing Tables in Brisbane to Cater Your Next Event
For those in Brisbane looking to impress their guests with a visually appetizing display of delicious food and refreshing beverages, grazing tables…
9 Best Grazing Tables In Adelaide to Cater Your Next Event
If you're hosting an event in Adelaide, everything may be set- the venue has been booked, the decorations have been placed, and the invites have been…
8 Best Grazing Tables on the Gold Coast to Cater Your Next Event
If you're looking to host a memorable event or celebration, consider setting up one of the many breathtaking grazing tables on the Gold Coast. These…